Showing posts with label vintage crafts. Show all posts

Saturday, November 27, 2010

♥ Crochet: Vintage Crocheted Apron ♥

original photo from Star Book Gallery of Crochet and Knitting
This free pattern and photo originally published in Star Book Gallery of Crochet and Knitting, No. 89.

Material:

"PURITAN" CROCHET COTTON, Article 40 (2 balls White, 1 ball Pink, 1 ball Nile Green)

OR "DE LUXE" CROCHET COTTON, Article 346 (2 balls White, 1 ball Pink, 1 ball Light Green)

Size of Needle: steel 7

1 ¼ yds. ⅞" ribbon.


WAIST BAND: With Pink, ch 14, 2 d c in 6th st from hook, ch 2, 2 d c in same space, ch 3, skip 3 sts of ch, s c in next st, ch 3, skip 3 sts of ch and work 2 d c, ch 2, 2 d c in last st of ch, ch 5, turn.

2nd Row. 1 d c, ch 3, 1 d c shell in center of shell, ch 5, 1 d c, ch 3, 1 d c in center of next shell, ch 5, turn.

3rd Row. 2 d c, ch 2, 2 d c shell in ch 3 loop, ch 3, 1 s c over ch 5 loop, ch 3, 2 d c, ch 2, 2 d c shell in next ch 3 loop, ch 5, turn.

Repeat the last 2 rows until there are 67—ch 5 loops across side of band, ending with the 3rd row, cut thread.

Attach White in 23rd loop, ch 3, d c in same loop, ch 2, 2 d c in same loop, * ch 5, 2 d c, ch 2, 2 d c shell in next loop, repeat from * 3 times, ** ch 5, 3 d c, ch 2, 3 d c in next loop, * ch 5, 2 d c shell in next loop, repeat from * 4 times, then repeat from ** twice, ch 5 to turn each row.

2nd Row. * 1 d c, ch 3, 1 d c shell in next shell, ch 3, s c over next loop, ch 3, repeat from * 3 times, 1 d c, ch 3, 1 d c in next shell, ch 5 (lace section), skip 1 d c of next 3 d c shell, 1 d c in each of the next 2 d c, 1 d c in next loop, ch 2, 1 d c in same loop, 1 d c in each of the next 2 d c of same 3 d c shell (solid section), ch 5, repeat from beginning twice and complete row to correspond. There are 4 lace sections and 3 solid sections in row.

3rd Row. Work 2 d c shells with ch 5 between shells in each shell of lace sections and work solid section same as previous row.

4th Row. Repeat 2nd row.

5th Row. Repeat 3rd row for lace sections and increase in solid sections as follows: 2 d c in 2nd d c, 1 d c in next d c, 1 d c in next loop, ch 2, 1 d c in same loop, 1 d c in next d c, 2 d c in next d c.

The 3rd and 4th rows of lace pattern are followed for en-tire apron and will not be referred to again. Following directions given are for the solid sections only.

6th, 7th and 8th Rows. 1 d c in 2nd, 3rd and 4th d c, 1 d c in loop, ch 2, 1 d c in same loop and next 3 d c.

9th Row. 2 d c in 2nd d c, 1 d c in each of the next 2 d c, 1 d c in next loop, ch 2, 1 d c in same loop and 1 d c in each of the next 2 d c, 2 d c in next d c.

10th, 11th and 12th Rows. 1 d c in 2nd, 3rd, 4th and 5th d c, d c in next loop, ch 2, 1 d c in same loop and next 4 d c.

Repeat the last 4 rows, having 1 more d c on each side of each solid section every 4th row until there are 40 rows made. There should be 12 d c in each side of each solid section. Increasing in same manner, work 18 more rows in the following color scheme: 2 rows each of Green, White, Pink and White, 4 rows Green, 2 rows White, 4 rows Pink and 2 rows White. Press apron and lace ribbon through waist band.


Thursday, December 3, 2009

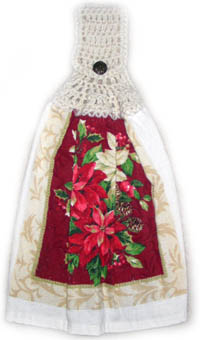
CROCHET HOW-TO: Easy Vintage-style towel hanger

How about a super easy-peasy Christmas gift? These are easy to whip up in no time and I love to hang one or two on my oven handle--perfect for those quick clean-up for messes or to wipe your hands on. You can do holiday towels or maybe your special person has a "theme" kitchen like gingerbread men, birds, sunflowers, teapots, etc. It's so easy to find those theme-printed towels and do a few for a Christmas gift! :) I'll be making some of these soon--next on my "to do" list. Enjoy!!

photo and directions from crochetspot.com:

DIRECTIONS:

You may either start by crocheting on the towel using a very small crochet hook or you can sew the finished topper onto your towel when you are finished making it.

Skill Level: crochet skill level easy
Finished Size: 5 1/2″ (14 cm) tall, 5 1/2″ (14 cm) wide when flat
crochet towel topper

Materials:
Medium Weight Yarn (small amount)
Crochet Hook J (6.00 mm)
Crochet Hook US 7 (1.5 mm) – only if crocheting topper onto towel
Sewing needle and thread – only if sewing topper onto towel
crochet yarn size 4
Crochet Pattern: Towel Topper
Row 1 (sew topper on towel method): with crochet hook J (6.00 mm), ch 36, sc in second ch from hook and in each ch across: 35 sc
Row 1 (crochet topper on towel method): using US 7 (1.5 mm) crochet hook, 35 sc evenly across top of towel: 35 sc
Row 2: with crochet hook J (6.00 mm), ch 1, turn, sc in each sc across: 35 sc
Row 3: ch 2 (counts as 1 dc now and throughout), turn, (dc in next sc, skip 1 sc) across, 2 dc in last sc: 20 dc
Row 4: ch 2, turn, (dc in next dc, skip 1 dc) across, 2 dc in last dc: 12 dc
Row 5: ch 2, turn, (dc in next dc, skip 1 dc) across, 2 dc in last dc: 8 dc
Row 6 – 17: ch 2, turn, dc in each dc across: 8 dc
Finish off.
Border
Attach yarn to lower corner of towel topper. Sc around side to top to other side of towel topper. Then finish off. Do not sc across bottom of towel topper since towel is (or will be) attached there.
Finishing
Sew button to towel, aligning it at the lower center of the handle such that the center of the last row can be used as a button hole. If you did not crochet the topper directly onto the towel, use thread and a sewing needle to sew the topper onto the top of the towel.

Thursday, October 8, 2009

VINTAGE CROCHET: APPLE POTHOLDERS

This free pattern and photo originally published by The Spool Cotton Company, Clark's O.N.T. Book No. 274, in 1951.

MATERIALS:

J. & P. Coats "Knit-Cro-Sheen," Art. A.64, 1 ball each of No. 1 White, No. 9 Yellow, No. 126 Spanish Red, No. 48 Hunter's Green and No. 17 Shaded Browns; or
J. & P. Coats or Clark's O.N.T. Pearl Cotton, Art. A. or B.19, Size 5, 2 balls of White; 1 ball each of No. 48 Hunter's Green. No. 126 Spanish Red, No. 43 Dk. Yellow and No. 81 Dk. Brown; and

J. & P. Coats Six Strand Embroidery Floss, Art. A.11, or Clark's O.N.T. Six Strand Cotton, Art. B.11, 1 skein of No. 12 Black.

Milwards Steel Crochet Hook No. 7.

A piece of red felt for lining.

Starting at center with Yellow, ch 6. Join with sl st to form ring. 1st rnd: Ch 3, 15 dc in ring, ch 3, sl st in ring. 2nd rnd: 5 sc over first ch-3, sc in next 5 dc, 2 sc in each of next 2 dc, 3 sc in next dc, 2 sc in each of next 2 dc, 5 sc over next ch 3, sl st in first sc. 3rd rnd: Sl st in next sc, sc in next 2 sc, dc in next 11 sc, 3 dc in next sc, dc in next 11 sc, sc in next 2 sc, sl st in next 2 sc. Join with sl st to first sl st. 4th rnd: Sl st in next sl st, 2 sc in each of next 3 sts, sc in next 11 dc, 3 sc in next dc, sc in next 11 dc, 2 sc in each of next 3 sts, sl st in next 2 sl sts. Join and break off. 5th rnd: Attach White to first st, ch 3, dc in next 5 sts, 2 dc in each of next 2 sc, dc in next 8 sc, 2 dc in each of next 2 sc, dc in next 5 sc, 2 dc in each of next 2 sc, dc in next 8 sc, 2 dc in each of next 2 sc, dc in next 6 sts. Join to top of ch-3. 6th rnd: Sc in same place as sl st, sc in next dc, half dc in next 2 dc, dc in next 3 dc, tr in next 3 dc, 2 tr in next dc, 2 dc in each of next 3 dc, dc in next 5 dc, 2 dc in next dc, dc in next 9 dc, 2 dc in next dc, dc in next 5 dc, 2 dc in each of next 3 dc, 2 tr in next dc, tr in next 3 dc, dc in next 3 dc, half dc in next 2 dc, sc in next 2 dc. Join. 7th rnd: Sc in same place as sl st, sc in next st, half dc in next 2 sts, 2 dc in each of next 2 sts, 2 tr in each of next 2 sts, tr in next 4 sts, (2 dc in each of next 2 sts, dc in next 4 sts) twice; 2 dc in next st, dc in next 9 sts, 2 dc in next st, (dc in next 4 sts, 2 dc in each of next 2 sts) twice; tr in next 4 sts, 2 tr in each of next 2 sts, 2 dc in each of next 2 sts, half dc in next 2 sts, sc in next 2 sts. Join. 8th rnd: Sc in same place as sl st, sc in next sc, half dc in next 2 sts, 2 dc in each of next 2 sts, 2 tr in each of next .2 sts, tr in next 4 sts, (2 dc in each of next 2 sts, dc in next 4 sts) 3 times; 2 dc in next st, dc in next 15 sts, 2 dc in next st, (dc in next 4 sts, 2 dc in each of next 2 sts) 3 times; tr in next 4 sts, 2 tr in each of next 2 sts, 2 dc in each of next 2 sts, half dc in next 2 sts, sc in next 2 sts. Join. 9th rnd: Ch 2, half dc in same place as sl st, half dc in next 2 sts, dc in next 3 sts, tr in next 3 sts, 2 tr in each of next 3 sts, tr in next 6 sts, dc in next 15 sts, 2 dc in each of next 2 sts, dc in next 4 sts, 2 dc in next st, dc in next 19 sts, 2 dc in next st, dc in next 4 sts, 2 dc in each of next 2 sts, dc in next 15 sts, tr in next 6 sts, 2 tr in each of next 3 sts, tr in next 3 sts, dc in next 3 sts, half dc in next 3 sts. Join to first half dc. 10th rnd: Ch 3, dc in next 9 sts, 2 dc in each of next 2 sts, tr in next 25 sts, 2 dc in each of next 2 sts, dc in next 4 sts, 2 dc in next st, dc in next 23 sts, 2 dc in next st, dc in next 4 sts, 2 dc in each of the next 2 sts, tr in next 25 sts, 2 dc in each of next 2 sts, dc in next 10 sts. Join. 11th rnd: Sc in same place as sl st, sc in each st around. Join and break off. 12th rnd: Attach Red to same place as sl st, sc in same place, sc in each sc around. Join. 13th rnd: Sl st in next 3 sc, sc in each sc around to within last 4 sc, sl st in last 4 sc. Join. 14th rnd: Sl st in next 5 sts, sc in each st around to within last 6 sts, sl st in last 6 sts. Join and break off. Make another piece the same way.

LEAF (Make 2) . . . Starting at center with Green, ch 30. 1st rnd: Sc in 2nd ch from hook and in next 2 ch, half dc in next 3 ch, dc in next 3 ch, tr in next 3 ch, d tr in next 5 ch, tr in next 3 ch, dc in next 3 ch, half dc in next 3 ch, sc in next 2 ch, 3 sc in next ch (tip of leaf); working along opposite side of starting chain make sc in next 2 ch, half dc in next 3 ch, dc in next 3 ch, tr in next 5 ch, dc in next 3 ch, half dc in next 3 ch, 2 sc in same place as first sc. 2nd and 3rd rnds: Sc in each st around, making 3 sc in center sc of each 3-sc group. Join and break off at end of 3rd end. Embroider veins with Black Embroidery Floss.

STEM (Make 2) . . . Starting at long side with Brown, make a chain 3 inches long. 1st row: Dc in 4th ch from hook and in each ch for 1 inch, 2 dc in each remaining ch (leaving 1 inch free from beginning of row), sl st in next ch on opposite side of starting chain to form loop. Break off.

With Black Embroidery Floss, embroider 2 lazy daisy sts on each side of center for seeds. Cut a piece of felt slightly larger than outer edge of each pot holder piece. Sew in place so felt overlaps edge slightly. Sew stem in place. Sew edge of leaf to each side. Sew loose ends of leaf together. Sew pot holder pieces together at top over rounded sides for 3 inches.

Thursday, February 12, 2009

Crochet: Rose Edging Pattern

This edging pattern and photo originally published by Clark's O.N.T. in Floral Insertions and Floral Edgings, Book 263, in 1949.

Materials:

J. & P. Coats Tatting-Crochet, Size 70, Rose (No. 46) and Bright Nile Green (No. 26-B) . . . Steel Crochet Hook No. 14.

Edging--Rose . . . Starting at center with Rose, ch 8. Join with sl st to form ring.

1st rnd: 20 sc in ring. Sl st in first sc.

2nd rnd: Ch 1, sc in same place as sl st, * ch 5, skip 3 sc, sc in next sc. Repeat from * around, ending with sl st in first sc.

3rd rnd: In each loop around make sc, half dc, 5 dc, half dc and sc. Sl st in next sc on previous rnd.

4th rnd: * Ch 7, sc in next sc on 2nd rnd. Repeat from * around.

5th rnd: In each loop around make sc, half dc, 7 dc, half dc and sc. Join and break off.

Leaf . . . Starting at tip with Green, ch 15.

1st row: Sc in 2nd ch from hook, sc in each ch across to within last ch, 3 sc in last ch (this is tip of Leaf), sc in each ch along opposite side of starting chain, sc in same place as last sc. Mark last sc for base of Leaf. Hereafter pick up only the back loop of each sc. Do not turn but work sc in each sc to within 3 sc from center sc at tip of Leaf. Ch 1, turn.

2nd Row: Sc in each sc to within marked sc, 3 sc in marked sc, sc in each sc on other side to within 3 sc from center sc at tip of Leaf. Ch 1, turn.

3rd and 4th Rows: Sc in each sc to within center sc of 3 sc group, 3 sc in next sc, sc in each sc on other side to within last 3 sts. Ch 1, turn.

5th Row: Same as 3rd row, making sc, ch 7 and sc in center sc of sc group at base of Leaf.

6th Row: Sc in back loop of each sc to within ch 7 loop, in loop make (3 sc, ch 5) 3 times and 3 sc; sc in back loop of each sc across to within last 3 sts. Break off. Make necessary number of roses and leaves, and tack together in alternate order, having a rose at both ends.

Heading . . . 1st row: Attach Green to center st of 2nd free petal on Rose, ch 8, sc in center st of next free petal, * ch 5, sc in next free picot on Leaf, ch 2, sc in next free picot, ch 5, tr in center sc on side of Leaf, ch 5, dc in center of next free petal on next Rose, ch 5, sc in center of next free petal on Rose. Repeat from * across, ending with sc in center of next petal. Ch 5, turn.

2nd Row: * Dc in ch 5 sp, ch 2, dc in next dc, ch 2, dc in next ch 5 sp, ch 2, dc in next tr, ch 2, dc in next ch 5 sp, ( ch 2, dc in next sc) twice; ch 2, dc in next ch 5 sp, ch 2, dc in next sc, ch 2. Repeat from * across, ending with dc in last ch 5 sp, ch 2, dc in 3rd st of turning ch 8. Break off.

Insertion . . . Work as for Edging No. EI-283, making Heading on both long sides and being careful to have the same number of spaces.

Saturday, December 13, 2008

How to: Crochet a Vintage Snowman Decoration

Hello dear friends in blogland,

I have always loved snowmen. I don't care what they're decorated on, or how they are made, I just have this fascination. Maybe it comes from always watching Frosty the Snowman as a child. :) Or maybe it's this cold weather we're experiencing! Whatever the reason, you just can't resist this guy. He's a lovely addition to your vintage decorations. If you want to make him more modern, wouldn't he look shabby chic in a pink hat and scarf?

Enjoy!


This free pattern and photo originally published by The American Thread Company in Star Christmas Book, No. 94, in 1952.

Mr. Snowman

Materials Required:


~AMERICAN THREAD COMPANY “AUNT LYDIA’S” HEAVY RUG YARN, Article 235
6 skeins White and PURITAN” CROCHET COTTON, Article 40
~1 ball Kelly Green and STAR” SIX STRAND EMBROIDERY COTTON, Article 50
~2 skeins each Bright Red and White
~1 skein each Burnt Orange, Black and Golden Brown
~Steel crochet hook No. 7
~1 pipe cleaner
~1 9-inch round stick about ¼ inch in diameter

Instructions:

HEAD:
Hold large crochet hook horizontally on 2 ½ x 5 inch cardboard. Wind 1 skein White “AUNT LYDIA’S” HEAVY RUG YARN over 2 ½ inch part of board. With large crochet hook pull three 22-inch lengths of yarn halfway through opening and tie. Remove cardboard. Trim into ball for head.

BODY:
Work 2 more pompons in same manner. Sew these 2 pompons together at tying point. Trim into a ball for center of body. Work 3 more pompons in same manner, sew together at tying point. Trim into a ball for lower part of body. Take the free lengths of yarn of head pompon, draw through the middle of the center body section and lower part of body.

Tie all ends together. Insert stick through center of entire snow man.

HAT:
Is worked with “PURITAN” CROCHET COTTON and “STAR” SIX STRAND EMBROIDERY COTTON.

With Green starting at cuff, ch 92, sc in 2nd st from hook, 1 sc in each remaining st of ch, join being careful not to twist work.

2nd Round-l sc in each sc, join, cut thread.

3rd Round-Attach Red and work 1 sc in each sc, join, cut thread. Working in same manner work 2 rounds Green, 1 round White, 1 round Red, 1 round White, 2 rounds Green, 1 round Red and 2 rounds Green.

14th Round-Ch 3, counts as 1 dc, 1 dc in each sc, join and turn this and following rounds. Work 2 more rounds even in dc.

17th Round-Working in dc, decrease in every 9th and 10th st (to decrease: *thread over hook, insert in next st, pull through and work off 2 loops, repeat from * once, thread over and work off all loops at one time).

18th Round-Decrease in every 8th and 9th st.

19th Round-Decrease in every 6th and 7th st. Work 2 rounds even. Repeat the last 3 rounds 7 times.

43rd Round-Decrease 3 sts. Work 1 round even. Repeat the last 2 rounds 3 times.

Next 2 Rounds-Same as 41st round, cut thread leaving a length for sewing. Sew opening closed. With wrong side of 1st round toward you, attach Green and work 1 sc in each st, join, cut thread. Fold colored section upward.

TASSELL:
Cut 10-4 inch lengths of each color. Tie at center then tie about ¼ inch from 1st tying. Sew to top of hat.

SCARF:
With Green ch 15, dc in 4th st from hook, 1 dc in each remaining st of ch, turn.

2nd Row-Ch 3, 1 dc in each dc, turn. Repeat last row until work measures 16 inches, cut thread.

FRINGE:

Cut 2-4 inch lengths of thread, fold in half, loop through a st, pull ends through loop and pull tightly. Working in same manner arrange colors as follows-2 Green, 1 Red, 2 Green, 1 White, 1 Red, 1 White, 2 Green, 1 Red and 2 Green.

NOSE:
With Orange ch 13, sc in 2nd st from hook, 1 sc in each remaining st of ch, ch 1 to turn all rows.

2nd Row-Working in sc, work 2 sc in each sc. Work 1 row even.

4th Row-Decrease in every 2nd and 3rd st across row. Work 1 row even. Repeat the last 2 rows 4 times.

14th Row-Decrease 2 sts, cut thread leaving a length. Sew long edges together. Fill with kapok.

EYES AND BUTTONS:
With Black ch 2, 8 sc in 2nd st from hook, do not join.

2nd Round-2 sc in each sc, join, cut thread. Work 4 more circles in same manner.

MOUTH:
With Red ch 15, sc in 2nd st from hook, sc in next st, 1 sdc in each of the next 2 sts (sdc: thread over hook, insert in st, pull loop through, thread over and work off all loops at one time), 1 dc in each of the next 2 sts 1 trc in each of the next 2 sts, 1 dc in each of the next 2 sts, 1 sdc in each of the next 2 sts, 1 sc in each remaining st, cut thread.

Sew eyes, nose, mouth and buttons in position as illustrated.

BROOM:
Wind Golden Brown tightly over a pipe cleaner, fasten ends with tape or glue, bend one end about ½ inch. Over a 1 ½ inch cardboard wind Golden Brown 90 times, slip length of thread through one end and fasten to bent end of pipe cleaner, twist end of pipe cleaner tightly to hold broom in place. Tie broom about ⅜ inch from 1st tying. Insert through body as illustrated.

Sunday, December 7, 2008

How to: Vintage Jack Frost Doll

Hello friends,

Oh my gosh! I couldn't believe it when I found this pattern! I remember have a jack frost doll and a girl doll make from this exact pattern in the '70s. Wow, talk about some memories! He is so cute, so I just have to add him to the vintage crafts list.

Enjoy those vintage memories,


This free pattern and photo originally published by The American Thread Company in Star Christmas Book, No. 83, in 1951.


Jack Frost

Materials Required:

AMERICAN THREAD COMPANY “STAR” RUG YARN, Article 44 or “DAWN” KNITTING WORSTED, Article Wll or W 411 skein White will make 2 Jack Frosts and “STAR” PEARL COTTON, Article 90, size 5 1 ball Black.

Steel crochet hook No.8.

Directions are given for rug yarn. Wool directions are given in brackets.

BODY:
Wind White over 4 inch cardboard 66 (76) times, tie with an 8 inch length of yarn at one end for top of head. Tie securely about 1 ¼ inches from top of head for neck. Tie 1 ¼ inches from neck for waist. Divide remaining yarn in half for legs and tie each section ¼ inch from each end, cut and trim for feet.

ARMS:
Wind White over 4 inch cardboard 22 (24) times, tie ¼ inch from each end for hands, insert through center of bodv and tie at each side for shoulders. Cut and trim ends for hands. With Black, embroider eyes, nose, mouth and buttons as illustrated.

HAT:
With Black, ch 2, 6 s c in 2nd st from hook, join in 1st s c.
2nd Row.Ch 1 and work 2 s c in each s c (12 s c), join.
3rd Row. Working in s c, increase in every other s c, join.
4th Row. Increase in every 3rd s c, join.
5th Row. Increase in every 4th s c, join, (30 s c).
6th Row. Working in back loop of st, 1 s c in each s c, join.
7th to 17th Rows. Working through both loops of sts and joining each row, work 1 s c in each s c.
18th Row. Working through front loop of st, work 1 s c in each s c, join.
19th Row. Working through both loops, work in s c increasing 1 s c in every 6th s c, join.
20th Row. Increase in every 7th s c, join.
21st Row. Increase in every 8th s c, join.
22nd Row. Work 1 s c in each s c, cut yarn.

Draw yarn at top of head through center of hat and tie as illustrated.

Sew hat to head. If desired brush hat with glue and sprinkle with artificial snow.


Happy Holidays!


Saturday, December 6, 2008

I love new items made from vintage tablecloths

Hello friends in blogland,

I hope you are having a fabulous Saturday! I was browsing etsy and just had to share some pics. I love when vintage tablecloths and hankies are "re-cycled" into some new items. And these are some lovely pillows and ornaments in the Christmas style. Hop on over to Leslie Janson's shop and see what I mean...HER ETSY SHOP.

Enjoy!


Thursday, December 4, 2008

Flickr Inspirations: Button Wreaths

Hello my craft friends in blogland,

Sometimes I find I don't need a tutorial as much as I just need some inspiration. Don't you feel the same way? Well, here's some vintage button wreaths from Flickr to inspire!

Enjoy!
 

Please click on photos to be taken to owner's page on Flickr for more info! Thanks!

Wednesday, December 3, 2008

How to: Crochet Vintage Snowflakes

Hello friends!

I remember one year when I was a teenager, we had a christmas tree decorated with lights, red satin balls, silver tinsel, and white crocheted snowflakes! Well, I assure you it was quite fashionable in the 1980's. :) I have always loved those little crocheted snowflakes, so here's some vintage directions. Add some more vintage to your tree. Or how about adding them as decorations on your gifts? I'm sure you can always come up with ideas for these little beauties.

Enjoy and happy crocheting,


This free pattern and photo originally published by The American Thread Company in Star Christmas Book, No. 94, in 1952.

SNOWFLAKE (at bottom)

Materials Required:

~AMERICAN THREAD COMPANY “STAR” CROCHET COTTON, Article 30, size 50. (1 ball White will make about 15 snowflakes.)
~Steel crochet hook No. 13.


Ch 4, join to form a ring, ch 8, dc in ring, * ch 5, dc in ring, repeat from * 3 times, ch 2, dc in 3rd st of ch (this brings thread in position for next round).

2nd Round-Ch 3, sc over dc just made, * ch 7, sc in next loop, ch 3, sc in same space, repeat from * 4 times, ch 3, trc in dc.

3rd Round-Ch 3, sc in trc, * ch 9, sc in 4th st from hook for picot, ch 3, sc in same space, ch 3, sl st in same space (picot cluster), repeat from * twice, ch 5, sc in next ch 7 loop, ch 3, sc in same space, repeat from 1st * 4 times, * ch 9, sc in 4th st from hook for picot, ch 3, sc in same space, ch 3, sl st in same space, repeat from * twice, ch 5, sl st in trc, cut thread.

4th Round-Attach thread in center picot of 3rd picot cluster of any loop, * * ch 11, sl st in 4th st from hook for picot, * ch 4, sl st in 4th st from hook for picot, repeat from * once, ch 3, sl st in same space, ch 3, sl st in same space, working on opposite side, * sl st in same space with next picot, ch 3, sl st in same space, repeat from * once, * ch 7, sc in center picot of next picot cluster, repeat from * twice, repeat from * * all around, cut thread.

SNOWFLAKE (left)

Materials Required:

~AMERICAN THREAD COMPANY “STAR” CROCHET COTTON, Article 30, Size 50. (1 ball White will make 10 snowflakes.)
~Steel crochet hook No. 13.

* Ch 5, 3 trc in 4th st from hook keeping last loop of each trc on hook, thread over and pull through all loops at one time (a rice st), repeat from * 5 times, join being careful not to twist sts.

2nd Round-Ch 4, 2 trc in same space keeping last loop of each trc on hook, thread over and pull through all loops at one time, ch 4, sl st in same space with joining (petal), ch 4, 3 trc in same space with joining keeping last loop of each trc on hook, thread over and pull through all loops at one time, * ch 3, 3 trc in ch 1 between next 2 rice sts keeping last loop of each trc on hook, thread over and pull through all loops at one time, ch 4, sl st in same ch 1, ch 4, 3 trc in same ch 1 keeping last loop of each trc on hook, thread over and pull through all loops at one time, repeat from * all around, ch 3, join in top of 1st petal.

3rd Round-Work 3 rice sts same as in 1st row, sl st in top of next petal, ch 3, sl st in top of next petal, repeat from beginning all around.

4th Round-Sl st into the ch 1 between 1st 2 rice sts, * * ch 5, sl st in 4th st from hook for picot, * ch 5, sl st in 4th st from hook for picot, repeat from * twice, ch 1, sc in the ch 1 between next 2 rice sts, ch 7, sl st in 4th st from hook for picot, * ch 5, sl st in 4th st from hook for picot, repeat from * 4 times, dc in the ch 1 between 3rd and 4th picots from hook, ch 5, sl st in 4th st from hook for picot, trc between next 2 picots on opposite side, ch 5, sl st in 4th st from hook for picot, dtrc (3 times over hook) between next 2 picots on opposite side, ch 5, sl st in 4th st from hook for picot, skip 1 picot, tr trc (4 times over hook) in next st of ch on opposite side, ch 2, skip 1 rice st and ch 3 loop, sc in ch between next 2 rice sts, repeat from * * all around, join, cut thread.

SNOWFLAKE (top)

Materials Required:

~AMERICAN THREAD COMPANYSTAR” CROCHET COTTON, Article 30, Size 50. (1 ball White will make 9 snow flakes.)
~Steel crochet hook No. 13.

Ch 5, join to form a ring, ch 7, dc in ring, * ch 4, dc in ring, repeat from * 3 times, ch 4, join in 3rd st of ch.

2nd Round-Ch 1 and work 6 sc over each loop, join.

3rd Round-* Ch 5, 2 trc in 5th st from hook keeping last loop of each trc on hook, thread over and pull through all loops at one time (a rice st), ch 5, rice st in 5th st from hook, skip 6 sc, sc in space over the dc of previous round, repeat from * all around.

4th Round-Ch 9, rice st in 5th st from hook, * * ch 2, trc between next 2 rice sts, * ch 4, sl st in 4th st from hook for picot, repeat from * three times, ch 7, sl st in 4th st from hook for picot, * ch 4, sl st in 4th st from hook for picot, repeat from * twice, sl st in top of last trc, ch 7, work a rice st in 5th st from hook, trc in next sc, ch 5, work a rice st in 5th st from hook, repeat from * * all around joining last rice st in 4th st of ch.

5th Round-Ch 8, dtrc (3 times over hook) in same space, * ch 9, 5 dc in ch 3 loop at top of picots, ch 9, 1 dtrc, ch 3, 1 dtrc in next trc, repeat from * 4 times, ch 9, 5 dc in next ch 3 loop at top of picots, ch 9, join in 5th st of ch.

6th Round-Ch 1, * * 3 sc over the ch 3 loop, ch 4, sl st in top of last sc for picot, 2 sc over same loop, 10 sc over next ch 9 loop, * sc in next dc, ch 4, trc in top of sc just made, ch 4, sl st in top of trc for picot, ch 4, sl st in same sc, repeat from * 4 times, 10 sc over next loop, repeat from * * all around, join, cut thread.

Monday, December 1, 2008

How to make a vintage CHRISTMAS CARD BASKET

Hello friends in blogland,

I used to think I was "showing my age" by my love of vintage Christmas items. Now, I will only admit to being 39.999! :) I have always had a love of vintage anything. I think it reminds me of my past growing up, not so much the actual memories of those times as much as the feelings it evokes of the time era when the world wasn't such a scary place. Back when Wal-mart employees didn't have to fear being trampled to death my a surging crowd of Black Friday shoppers. Really! What is this world coming to? The times might have been hard, but we didn't have bail-outs & reports of terrorism bombarding us from the news every day.

Vintage brings the feelings of simple times, when we were thankful for the things we had & didn't live in a credit-card debt society--a classic result of "keeping up with...(whomever )" and the need for instant gratification--got to have it NOW.

I love these old Christmas card baskets and when I found the instructions on-line, I had to share them with you! I think you will remember these, if you're still 39 like me. :) Let's start December off with a vintage craft!

Enjoy your day,


From allfreecrafts.com, "This recycled Christmas card project is one that many people remember from the past, but they are just not quite sure of how it was done - so here are the complete instructions to make a recycled card basket from old Christmas cards.

This project is more time consuming than I expected, although our free printable pattern will make it a little easier for you. I would suggest cutting out all the card pieces, then settling down to finish the rest of the project while watching your favourite Christmas movie.

The finished card basket is surprisingly sturdy and would look lovely on a hall table filled with scented pine cones or potpourri."

Christmas Card Basket

Supply list:

~ 14 used Christmas cards
~ white glue
~ yarn in Christmas colors
~ computer and printer with paper~
printable pattern
~ yarn needle
~ small but sharp-pointed scissors, sharp awl or similar item to poke holes through two cards glued together
~ optional: crochet hook

Instructions:

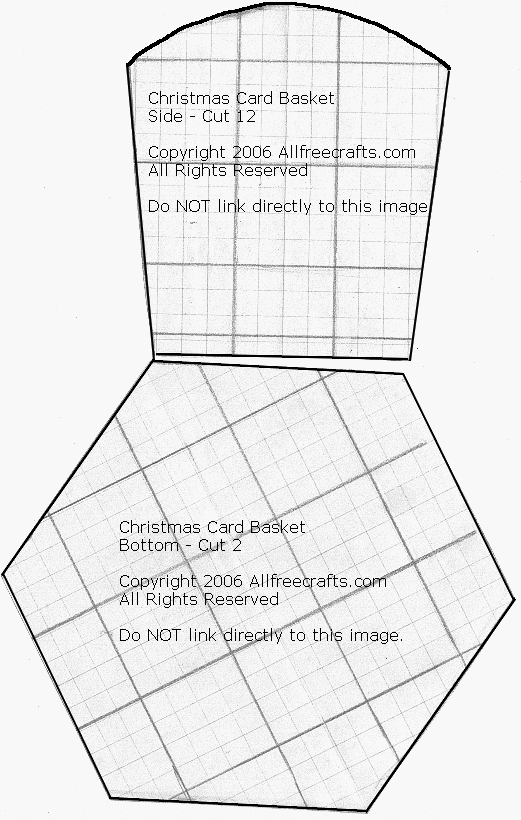
Print the two free printable pattern pieces and cut them out. Trace around the patterns on the back of two old Christmas cards and cut out these patterns to use as templates.

Note: If you don't have a computer printer, you could make your own paper patterns by drawing your own version - each large pencilled square equals one inch, so draw a 1" grid then copy our pattern.

Trace around your templates, then cut out 12 sides and 2 bottom pattern pieces from the front of old Christmas cards. Try to center the nicest part of the card pictures in the middle of each piece.

Glue two sides together, with the pictures facing outwards on each side; do the same for bottom pieces. Let the glue dry.

Perhaps the hardest part of this project is poking holes all around the edge of each pattern piece. These are sewing holes used to frame each piece with blanket stitch. I used a large needle to create the holes at first, but then found the sharp tip of some small steel scissors worked better for me. You could also try the tip of small awl.

Make the holes about 1/4 inch apart and about 1/4 inch from the edge.

Take your yarn and sew a blanket stitch all around each pattern piece. The illustration at right shows how to sew a blanket stitch.

When you have finished edging with blanket stitch, begin sewing all the side pieces to the bottom, then sewing all the sides together.

Your Christmas card basket is now complete. However, if you know how to crochet, you could finish off the top edge with one row of single crochet.