 |
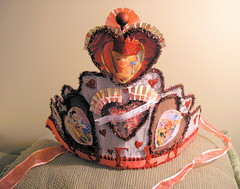
| photo and directions courtesy of Lily |
MATERIALS:
* Lily® Sugar’n Cream® Confectionary Colors (Ombres 340 g / 12 oz)- MC: Fruit Cake - 1 Ball
* Lily® Sugar’n Cream® Confectionary Colors (Solids 400 g / 14 oz)- A: Pistachio - 1 Ball
* Size 5 mm (U.S. H or 8) Crochet Hook or Size Needed to Obtain Gauge
INSTRUCTIONS:
**Bag measures approx 13 x 11 x 7 ins [33 x 28 x 18 cm].
**GAUGE: 12 sc and 13 rows = 4 ins [10 cm].
Front and Back: (make 2 pieces alike).
Note: Ch 3 at beg of rnd or row counts as dc.
With MC, ch 4. Join with sl st in first ch to form a ring.
1st rnd: Ch 3 (counts as dc). 2 dc in ring. (Ch 3. 3 dc in ring) 3 times. Ch 3. Join with sl st in top of ch 3.
2nd rnd: Sl st in next dc. Ch 3. *(3 dc. Ch 3. 3 dc) in next ch-3 sp.** 1 dc in center dc of next 3 dc. Rep from * twice more, then from * to ** once. Join with sl st in top of ch 3.
3rd rnd: Ch 3. 2 dc in same sp as sl st. *1 dc in center dc of next 3 dc. (3 dc. Ch 3. 3 dc) in next ch-3 sp. 1 dc in center dc of next 3 dc.** Miss next dc. 3 dc in next dc. Rep from * twice more, then from * to ** once. Join with sl st in top of ch 3.
4th rnd: Sl st in next dc. Ch 3. Miss next dc. 3 dc in next dc. 1 dc in center dc of next 3 dc. *(3 dc. Ch 3. 3 dc) in next ch-3 sp.** (1 dc in center dc of next 3 dc. Miss next dc. 3 dc in next dc) twice. 1 dc in center dc of next 3 dc. Rep from * twice more, then from * to ** once. 1 dc in center dc of next 3 dc. Miss next dc. 3 dc in next dc. Join with sl st in top of ch 3.
5th rnd: Ch 3. 2 dc in same sp as sl st. 1 dc in center dc of next 3 dc. Miss next dc. 3 dc in next dc. 1 dc in center dc of next 3 dc. *(3 dc. Ch 3. 3 dc) in nextch-3 sp.** (1 dc in center dc of next3 dc. Miss next dc. 3 dc in next dc)3 times. 1 dc in center dc of next 3 dc. Rep from * twice more, then from * to ** once. 1 dc in center dc of next 3 dc. Miss next dc. 3 dc in next dc. 1 dc in center dc of next 3 dc. Join with sl st in top of ch 3.
6th rnd: Sl st in next dc. Ch 3. (Miss next dc. 3 dc in next dc. 1 dc in center dc of next 3 dc) twice. *(3 dc. Ch 3. 3 dc) in next ch-3 sp.** (1 dc in center dc of next 3 dc. Miss next dc. 3 dc in next dc) 4 times. 1 dc in center dc of next 3 dc. Rep from * twice more, then from * to ** once. (1 dc in center dc of next 3 dc. Miss next dc. 3 dc in next dc) twice. Join with sl st in top of ch 3.
7th rnd: Ch 3. 2 dc in same sp as sl st. (1 dc in center dc of next 3 dc. Miss next dc. 3 dc in next dc) twice. 1 dc in center dc of next 3 dc. *(3 dc. Ch 3. 3 dc) in next ch-3 sp.** (1 dc in center dc of next 3 dc. Miss next dc. 3 dc in next dc) 5 times. 1 dc in center dc of next 3 dc. Rep from * twice more, then from * to ** once. (1 dc in center dc of next 3 dc. Miss next dc. 3 dc in next dc) twice. 1 dc in center dc of next 3 dc. Join with sl st in top of ch 3.
8th rnd: Sl st in next dc. Ch 3. (Miss next dc. 3 dc in next dc. 1 dc in center dc of next 3 dc) 3 times. *(3 dc. Ch 3. 3 dc) in next ch-3 sp.** (1 dc in center dc of next 3 dc. Miss next dc. 3 dc in next dc) 6 times. 1 dc in center dc of next 3 dc. Rep from * twice more, then from * to ** once. (1 dc in center dc of next 3 dc. Miss next dc. 3 dc in next dc) 3 times. Join with sl st in top of ch 3. Fasten off.
Top Edging: ***1st row: With RS facing, join MC with sl st in top right corner. Ch 3. 2 dc in same sp as sl st. (1 dc in center dc of next 3 dc. Miss next dc. 3 dc in next dc) 7 times. 1 dc in center dc of next 3 dc. 3 dc in next ch-3 sp. Fasten off.
2nd row: With RS facing, join MC with sl st in top of beg ch 3 of 1st row. Ch 3. 1 dc in next dc. Miss next dc. 3 dc in next dc. (1 dc in center dc of next 3 dc. Miss next dc. 3 dc in next dc) 7 times. 1 dc in center dc of next 3 dc. 1 dc in last dc. Fasten off.***
Bottom Edging: Work from *** to *** as given for Top Edging across bottom of Motif.
Outer Edging: Join MC with sl st in any corner. Ch 1. Work 1 rnd of sc around outer edge of Front and Back, having 3 sc in each corner. Join in first sc. Fasten off.
Gusset and Base: With A, ch 27.
1st row: 1 dc in 5th ch from hook (counts as dc, ch 1, dc). *Ch 1. Miss next ch. 1 dc in next ch. Rep from * to end of ch. 25 sts. Turn.
2nd row: Ch 4 (counts as dc and ch 1). *1 dc in next dc. Ch 1. Miss next ch-1 sp. Rep from *, ending with 1 dc in 3rd ch of turning ch. Turn.
Rep last row until work from beg measures 37 ins [94 cm]. Fasten off. Place markers on side edges 13 ins [33 cm] and 24 ins [61 cm] down from foundation row.
Handles (make 2).
With A, ch 13.
1st row: 1 dc in 4th ch from hook (counts as 2 dc). 1 dc in each of next 9 ch. 11 dc. Turn.
2nd row: Ch 3. 1 dc in each dc to end of row. Turn.
Rep last row until Handle measures 20 ins [51 cm]. Do not fasten off. Fold Handle in half lengthwise and work 1 row of sc through both thicknesses down length of Handle to join sides. Fasten off.
FINISHING:
Pin Front and Back pieces to Gusset and Base matching markers to corners. With WS tog and A, work 1 rnd of sc around Front and Back to join Gusset and Base. Sew Handles in position.


